Thai Basil Beef Tacos

Come on, you missed us didn’t you? Well fear not! We’re back! Amanda and I each had fairly active summers, which made Skype and planning our next meal a little difficult. So, we took little break this summer but are back in the kitchens now that autumn is upon us.

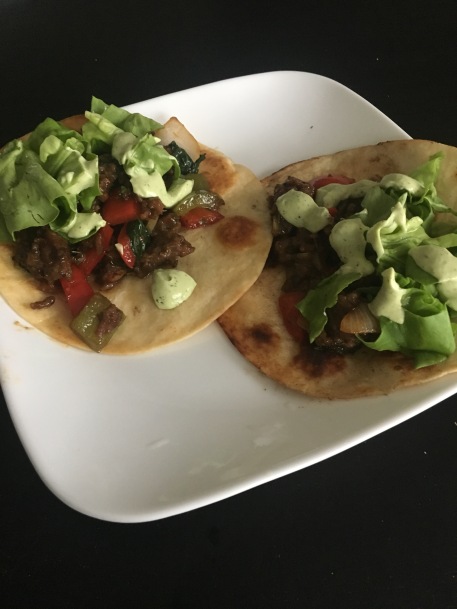
For this DistanceDishes dinner, we wanted to make a meal that summed up our food experience of the summer. While Amanda had her own epic adventures (we’re talking international y’all), that I’ll let her sum up later, I had my own fair share of trips to the airport. For work, I was back and forth to Washington DC a few times this summer which allowed me to escape the usual food haunts at home. I’ve been back and forth to DC a few times this year and I’ve begun to make it a tradition to treat myself to delicious Thai food. I was also lucky enough to meet up with some great DC friends at a Jose Andres restaurant and gorge myself of delicious tacos (and margaritas). I wanted to combine these two great memories into my “summer dish” with some Thai themed tacos.

Two other, slightly lazy but also semi-appropriate reasons I went with this dish. With all the travel, I have become terrible at getting to the grocery store regularly. Also, as I was gone, my Thai Basil plant grew too large for itself and fell over. Since I only had a few days to use it up, these Thai Basil tacos were the perfect meal. Believe me though, my laziness is your benefit. This makes for a very flavorful, quick and easy meal any night whether you’ve developed a DC Thai food addiction or not.

Ingredients:

  • 1/4 cup soy sauce
  • 1 tbsp sesame oil
  • 2 tbsp brown sugar
  • 2 tbsp mirin
  • 1 tbsp minced ginger
  • 4 cloves garlic, minced
  • 1 tsp fish sauce
  • 1 tbsp corn starch
  • 2 green onions, diced with greens and white separates
  • 1/2 medium yellow onion, diced
  • 1 cup diced bell pepper (I used a combination of red and green)
  • 1/2 cup roughly chopped Thai basil
  • 1 lb ground beef
  • Tortillas
  • Lettuce for topping

Avocado Lime Topping:

  • 1/2 avocado
  • 1/4 cup fresh cilantro
  • 1/2 cup yogurt
  • 1/4 cup lime juice
  • salt to taste (1/4 tsp to start)

Instructions:

  1. In a small bowl, whisk together soy sauce, sesame oil, brown sugar, mirin, ginger, garlic, the whites of your green onions, fish sauce and cornstarch. Set aside.
  2. Over medium heat, add the ground beef to a medium skillet or saucepan. Break up the beef and cook until meat is browned, about 5 minutes. Remove the beef from the pan and transfer to a small bowl (or whatever holding area you prefer–paper plate for easy cleanup? Sure!) and drain excess fat (for responsible discarding).
  3. Return your pan to medium heat and add your diced yellow onion and bell peppers. Cook until onions become slightly translucent and bell peppers start to become soft, about 3-5 minutes.
  4. Return the cooked ground beef to your pan with the onions/peppers and pour your soy sauce mixture over ingredients in pan. Stir to ensure all ingredients are fully incorporated. Soy sauce mixture should begin bubbling and stir for an extra 1-2 minutes until sauce begins to thicken. Stir in your Thai basil and continue stirring until basil is just wilting.
  5. Remove from heat, garnish with greens of the green onions and prepare your tacos to serve.

For the avocado lime topping:

  1. Add all ingredients to a blender and blend until smooth. Place a dollop on top of a hefty scoop of your basil beef on top of a flour tortilla. Enjoy!

Wine Pairing: There are a lot of (delicious) flavors going on here, but a classic like a Cabernet Sauvignon probably wouldn’t be a bad choice. Cheers!

97AC0A17-46BA-4103-9F06-F303F2F077F9


Smokey Bison Chili, Inspired by Westworld

Merideth and I have had a lot of fun in the past coming up with foods I inspired by our favorite movies and t.v. shows, and I’ve been itching to try bison since I saw it unexpectedly at my grocery store, so the premiere of Westworld last month was perfect! Much easier to figure out than this season’s plot, so far 🙃

I used hickory salt to give this chili a Western type flavor along with the seared vegetables, but feel free to substitute with 3tbs of liquid smoke at the end. If you can’t find bison, ground beef is a just as tasty (though not as lean) alternative.

Ingredients

  • 2lbs ground bison
  • 1 8oz can each, red and black beans
  • 1 8oz can hominy
  • 2 poblano peppers
  • 2-3 jalapeño peppers
  • 2 tomatoes
  • 3 corn cobs
  • 1 bottle dark or amber beer
  • 3 cloves garlic, minced
  • 1 onion, diced
  • Olive oil
  • hickory salt
  • 2tbs oregano
  • 2tbs cumin
  • 1/4 cup barbeque sauce
  • Pepper

Instructions

  1. Crumble bison and season with hickory salt and pepper. Brown in grill pan over high heat.
  2. Do not drain pan. Coat peppers and other vegetables with olive oil and season with hickory salt. Sear vegetables on all sides using tongs, until tomatoes and peppers have blistered.
  3. Dice vegetables, slicing roasted kernels off the corn cobs. Add to large soup pot or, if using slow cooker, to slow cooker bowl.
  4. Add ground bison, onion, garlic, beans, sessonings, and hominy to pot.
  5. Pour bottle of beer into pot, adding more water one empty 8oz can at a time as necessary.
  6. Simmer for 45 minutes or, if using slow cooker, cook 4 hours on high.

Slow Cooker Bordelaise Beef

After two weeks of activities after work and traveling, Merideth and I were not in the mood to get complicated with our dinners this week. Based off a classic French sauce recipe, this roast felt fancy (even though it takes only about 10 minutes of prep!)

Ingredients

  • 2-3lbs chuck roast
  • 3tbs butter
  • 2 shallots, minced
  • 2 cups mushrooms, rinsed and stemmed
  • 1 cup beef broth
  • 1 1/2 cups dry red wine
  • 1 tbs Worcestershire sauce
  • 2 bay leaves
  • 2tbs chopped thyme
  • salt and pepper

Instructions

  1. Heat butter over medium high heat and sear and sear chuck roast, approximately 2 minutes on each side. Put roast into slow cooker. Season with salt and pepper as desired
  2. Simmer shallots in butter until translucent, about 2 minutes.
  3. Add shallots, mushrooms, worcestershire sauce, bay leaves, and thyme to slow cooker. Pour over wine and beef broth.
  4. Cook on low 8 hours or high 4 hours and serve with mushrooms.

Wine Pairing: My favorite thing about cooking with wine is that, after preparing the recipe, you’re left with an open bottle! Don’t be wasteful – enjoy the roast with the red wine from your recipe; in my case, I used a cabernet sauvignon from France.

Bulgogi Sub with Gochujang Mayonnaise

With the Winter Games happening earlier this year, Amanda and I wanted to celebrate those South Korean flavors much like we did with the Summer Games in Brazil. There’s nothing quite like taking a huge bite of delicious food from the comfort of your couch while watching athletes in their physical prime work their hardest for gold. I know bulgogi is one of the best known foods from Korea, but to me it does have a special place in my heart.

Back when my preferences were only for chicken nuggets and french fries, my parents had a favorite sandwich place near our house that specialized in bulgogi sub sandwiches. They would often treat themselves to a foot-long and the aromas would permeate the air in the car as they brought them back home, often lingering for days. While anything with such a name I wouldn’t touch with a ten foot pole at the time, I remember loving that smell. Years later when my eyes were opened to the deliciousness of bulgogi, I still lament that I never had the chance to try that sub (and duh, anything that smells that great should taste so amazing). With this theming, this seemed like the perfect chance to create my version! I’ve come a long way since then; I mean I even added vegetables voluntarily! The fresh crunch of the veggies with the bold flavors of the mayonnaise and bulgogi really make this sandwich a memorable treat and I encourage you to try your own, even though the games are long over now.

Bulgogi Ingredients:

  • 2 lbs of thinly sliced sirloin or ribeye*
  • 1/3 cup soy sauce
  • 3 tbsp minced garlic cloves
  • 3 tbsp brown sugar
  • 2 tbsp sesame oil
  • 1 tbsp minced ginger
  • 1/2 onion, diced (4 green onions also work)
  • Black pepper

*If you can’t find thinly sliced beef, you can pop your preferred cut into the freezer for 30 minutes and then slice as thinly as you can manage. 

Bulgogi Instructions:

  1. Whisk together all of the marinade ingredients and pour over the beef in a shallow dish or zip-top bag. Allow to marinate for at least one hour, ideally overnight.
  2. When you are ready to cook, heat a skillet over medium-high heat and remove the beef from the marinade. Sear the beef in batched so as not to overcrowd the pan, until the beef is cooked through. At this point, bulgogi can be enjoyed over rice, as part of another dish or in the sandwich we’re making here.

Mayonnaise* Ingredients :

  • 2 egg yolks
  • 1 tsp dijon mustard
  • 2 tsp gochujujang
  • 1 tbsp lemon juice
  • 1 cup grapeseed oil
  • 1 cup olive oil
  • Salt
  • Up to 2 tbsp water

Mayonnaise Instructions:

  1. Using a food processor, combine the lemon juice, egg yolk, gochujang and grapeseed oil. Process on low until you have a thick consistency and the color has lightened.
  2. With the processor on low (you can also use a whisk), drizzle the olive oil in slowly to create an emulsion. This might take a few minutes. Once the oil is combined, the color has lightened further and you have a mayonnaise consistency you are ready for use. Add in the water to achieve your desired consistency, and add salt to taste. Allow to sit at room temperature for an hour or so and then you can store in the fridge for up to 2 weeks.

*If the idea of raw eggs isn’t your game, you can always try mixing gochujang with some store-bought mayo, proportions to your taste.

Assembly Ingredients:

  • Baguette or bread of your choice, although I’d recommend a sturdy one.
  • Shredded carrots (I used slices made with a peeler but the pre-shredded ones could work as well)
  • Lettuce
  • Mild onions, or you could try a quick pickled onion recipe
  • Thinly sliced cucumber

Assembly:

  1. I like to spread a layer of the mayonnaise on the bottom half of the bread, topped with the lettuce to keep it in place. Then add your carrots, cucumber, beef and finally onions. Top with more mayonnaise if desired, add your top half of bread, and enjoy!

Wine Pairing: I think a Pinot Noir would go well with the beef as well as stand up to the spicy mayo. Enjoy!

Bulgogi pic 2

Filet Mignon with Mushroom Shallot Butter

Amanda and I have made no effort to hide our love of Masterchef, and when the contestants were taught to break down a large piece of meat, we were inspired. Amanda and I wanted to try our hand at breaking down a large cut into smaller, more presentable portions. In my case, I had done this before with a whole beef tenderloin (also called a PiSMO) and so I thought I would share.

Whole Tenderloin, because they require less processing, are usually a pretty economical choice considering that this one of the most prized parts of the cow. They are generally vacuum packed and sold at a much lower rate per pound than their individually packaged counterparts. Since there is a lot of meat in one of those packages, the overall cost might still be high. However, considering I have usually managed to get 8-10 dinners out of one piece, it still works out to be a great deal.

After breaking everything down, obviously the best reward would be to cook one of these newly trimmed filets up for yourself. Combined with the mushroom shallot butter recipe below and a glass of wine, I think you’re in for a good night after hauling that hunk of beef home from the store.

img_3021.jpg

Breaking down a whole (or half in my case) Beef Tenderloin: 

  1. Pull the initial layer of fat off the tenderloin. You may need a knife to get an initial tear in the fat started, but once you get your fingers under this layer, you should be largely able to remove with your hands.
  2. With the fat removed, you should be able to make out three parts of the meat. The actual tenderloin is the long, circular portion in the middle. On one side will the “Chain”which is the smaller, longer piece. On the other side, is a wide, thick portion much shorter than the tenderloin. Remove the pieces on either side of the tenderloin and reserve for recipes of your choice. The chain makes excellent stir fry meat and the other portion is also great as a roast!
  3. Now that the tenderloin is trimmed, you should be able to see a layer of “silverskin” on some of the meat. This must be removed as it does not render like other fat. To remove, stick the tip of your knife under a small piece. Once you can get your finger under the silverskin, lift the skin with one hand and peel it off the meat, using your knife when needed. This part can be a bit tricky, but continue to peel off the silverskin in strips this way until all is removed. IMG_3028
  4. Now the tenderloin is ready to be portioned. You can keep it whole if you’d like, but I usually like to cut some of it into filets. Slice into 2″ portions. The end with the taper can be butterflied into a filet if you would like or you can save that end as a roast if you want to leave that portion a little thicker.
  5. I like to freeze the extra meat in freezer bags individually so I can pull them out whenever I’m craving some steak for dinner. Portions can stay in the freezer for up to 4 months.

img_3031.jpg

Filet with Mushroom Butter: 

Mushroom butter Ingredients:

  • 1 stick butter, room temperature
  • 1 lb baby Portobello mushrooms or mushrooms of your choice, minced.
  • 1 small shallot, minced.
  • Salt to taste
  • 1 tsp oil


Instructions: 

  1. In a small pan over medium heat, add the oil and saute the shallots until translucent, about 3 minutes. Add the mushrooms and a pinch of salt.
  2. Cook the mushrooms and shallots until the mushrooms have released their moisture and reduced size, about 5-7 minutes. Taste and add more salt if desired during cooking.  When finished, remove from heat and allow to cool for 10 minutes.
  3. Once cooled, add the stick of butter to a stand mixer and add your mushroom/shallot mixture and mix on medium speed for 2-3 minutes until everything is distributed.
  4. Spoon the butter mixture onto the middle of a sheet of parchment paper. Fold the paper in half over the butter, gently. Using a sheet pan and starting at the end where the paper corners meet, slowly slide the pan down and toward the butter so that elongates into a tube. Once this is completed, you can roll the leftover parchment around the butter and twist the ends. Chill the butter for at least 2 hours. This can be made up to 5 days in advance, or you can freeze it for up to 6 months.

  1. When you are ready to make your steaks, remove them from the fridge and allow to come to room temperature (about 30 minutes). Preheat the oven to 450°F and stick in a cast iron pan.
  2. Once the oven and pan are preheated, (carefully) move the cast iron pan to the stove top and heat over medium-high. Liberally salt and pepper your steaks and sear in the hot pan for 2 minutes on each side.
  3. Add a pat of the mushroom butter to the tops of the steaks and transfer the pan to the oven and cook until internal temperature reaches 140°F for medium rare. This should be about 3-5 minutes depending on thickness.
  4. Remove from the oven and allow steaks to rest on a cooling rack loosely draped with foil for 10 minutes. Top with an additional pat of butter and serve. Enjoy!


Wine Pairing: A Burgundy or a really bold Pinot Noir would be a great match with both the mushroomy undertones that the butter brings as well as the beef. Happy cooking!

Beef, Mushroom and Wild Rice Soup

The slow cooked meal is such a wonderful convenience in all seasons. While at first thought, it seems that it is best served during the winter months as the slow cooker rewards you with hearty stews and belly-warming chilis, it can definitely be a summer blessing as well. An oven or even a simmering pot on the stove can make the kitchen uncomfortably warm on an already warm day, and a slow cooker silently cooking away in the corner is an excellent alternative to using your kitchen towels to wipe sweat from your brows every two minutes.

This week, Amanda and I wanted to go low maintenance. I had some obligations on the day of our skype date so a set-it-and-forget-it recipe was just what the doctor ordered.  Since it was an unseasonably cold day, I did opt for a heartier beef soup but it could easily be enjoyed during warm weather as well. As stated above, the reduced use of heat emanating appliances would definitely make me more receptive to a soup in the middle of July for sure. Regardless, this soup was tasty, easy and made plenty of leftovers for weekday lunches.

Ingredients:

  • 2 lbs beef chuck, cut into 1 inch chunks.
  • 1 cup wild rice
  • 1 cup of sliced mushrooms, I used baby bellas but you could branch out with varieties.
  • 2 carrots, peeled and sliced into 1/2 inch thick clices.
  • 1 onion, diced.
  • 2 parsnips, peeled and cut into 1/2 inch thick slices
  • 1/2 bell pepper, diced.
  • 3 cloves garlic, minced
  • 6 cups beef broth
  • salt & pepper to taste

Instructions (I know. See if you can keep up with me here):

  1. If desired (and you will be rewarded in flavor), brown the beef over medium heat before adding to the slow cooker. However, if you’re like me and and feel that the point of the slow cooker is not to dirty any other pans, add all ingredients to the slow cooker, cover and cook on low for 8 hours. Enjoy with your favorite crusty bread or however you would like!

Wine Pairing: The umami flavor of the mushrooms and the rich beefy taste can stand up to a full bodied red like a syrah, which would warm the belly and bring even more comfort to a dinner with this soup. 

Beef and Beet Tajine

I got a lot of cookbooks over the holidays. A lot. Also some cool flavored vinegars, and food from the places that my family has traveled recently! The gift that came the farthest, though, was a tajine from Tunisia! Tajine (or tagines) are a traditional North African/Middle Eastern roasting pan with a conical top that keeps in the steam. I love it! This was the second dish that I made in my new pan and it makes my dishes taste more special.

wp-image-1564152818jpg.jpg


Merideth also received a new cooking toy for Christmas- a pressure cooker! Since we haven’t done a Distance Dishes dinner using the same recipe for a while, we decided to see the differences that our two new cooking methods would make on the same meal. We had a slight difference in ingredients too, depending on what we had on hand or available in our two hometowns. Delicious!

img_1972

Ingredients

  • 1 tbs oil and 1 pat butter (or 2 tbs ghee)
  • 4 garlic cloves, minced
  • 1 onion
  • 1 1/2 inch ginger, grated
  • 1-2 tsp red chile powder, to taste (or 1 red chile, chopped)
  • 2 tsp ground coriander
  • 1 tbs cinnamon (or 2 cinnamon sticks)
  • 1 lb lean beef, cut into chunks
  • 2 oranges, cut into segments and peeled
  • 2-3 tbs shelled pistachios
  • 1 tbs rosewater or orange flower water
  • Salt and pepper

Instructions (Tajine)

  1. Melt butter and olive oil in the bottom dish. Add garlic, ginger, and chopped onion and saute until onion is translucent.
  2. Add chili, coriander, and cinnamon and stir. Add beets and saute for 2-3 minutes.
  3. Add beef and saute until edges are browned, about 2-3 more minutes.
  4. Add water and bring to a boil. Cover with tajine lid, lower heat, and simmer for an hour.
  5. After an hour, add orange segments, rosewater, and season with salt and pepper. Cook for an additional 15 minutes and top with pistachios.

Instructions (Electric Pressure Cooker)

  1. Melt butter and olive oil in the bottom of the pot using the saute/brown function. Add garlic, ginger and chopped onion and saute until onion and translucent and mixture is fragrant.
  2. Add chili, coriander, and cinnamon and stir. Add beets and saute for 2-3 minutes.
  3. Remove this mixture temporarily from the pressure cooker and add the beef. Still using the saute/brown function, brown the beef for 3-4 minutes and then re-add the previously removed ingredients.
  4. Add about 3/4 of a cup of water or broth to the pot and add the oranges and rosewater/orange flower water.
  5. Set your pressure cooker to high pressure for 20 minutes and allow the steam to release naturally. Once the cooker is safe to open, serve over couscous, or some yummy Herb Saffron Rice and top with pistachios.

Wine Pairing: Cabernet Sauvignon and other dark red wines are usually the go-to for beef dishes. In this case, I really liked a Syrah/Shiraz for its smoky and stronger fruit flavors to go with the roasted meat and sweet fruit and beets.

Summer Dishes: Liquid Smoke Marinated Steak

Welcome to summer! Unfortunately, my condo complex doesn’t have a grill area and the one time that I tried to use a portable grill on my balcony I may have used too much self-lighting charcoal. For the a grill taste without compromising the safety of my patio furniture, I decided to put my steak in a liquid smoke marinade.Liquid smoke is a natural additive made from water infused with hickory smoke. You can find it in most grocery stores near the barbecue sauce. Its also good in slow-cooked chilis!

Why marinate?

Though marinating meat can also tenderize, the main purpose of marinades are to add flavor. Typically, they are composed of an acid  + an oil + flavorings. Acids can be vinegar, wine, juice, or even yogurt (like in Chicken Tikka Masala). More on marinades to come in another post!

Ingredients

2 rib eye steaks (one serving is approximately one lb.)

2 tbs canola oil

4 tbs butter (optional)

Marinade:

3 tbs balsamic vinegar

2 tbs soy sauce

8 cloves garlic, minced

2 tbs honey

1 tsp liquid smoke

1/4 tbs ground ginger

Ground pepper


Instructions:

  1. Combine marinade ingredients and add to steaks in large Ziploc bag. Chill in fridge for at least four hours or overnight.
  2. Once done marinading, remove steaks from bag onto a cutting board and discard marinade.
  3. Pat steaks dry with paper towel. This allows for the steak to better sear in the pan.
  4. Heat oil in pan over medium heat. I use a non-stick skiller, but cast iron pans are the “ideal”.
  5. Once oil is heated, lay steak in pan (away from you!). A minute or two in, I usually add a tablespoon or two of butter (yum!) Cook according to preferred temperature (see table below.)
  6. Flip steak after desired time has passed. Tongs work best for keeping the juices in the steak (and not flopping your steak out of the pan in the process). If desired, add more butter.
  7. Remove steak from pan and allow to rest 5-10 minutes before serving.

Cooking Times for Temperature:

Rare (1-2 minutes on each side)

Medium Rare (2-3 minutes on each side)

Medium (3-4 minutes on each side)

Medium Well (5 minutes on each side)

Well Done (6 minutes on each side)


Side Dishes: In keeping with the summery theme, I boiled some corn on the cob. This is a pretty low-maintenance but delicious side dish, with the corn being boiled for about 10 minutes. I also had watermelon salad with goat cheese. I think feta would be better next time, since the cheese crumbles better!

Wine Pairing: Between the richness of the steak flavors, liquid smoke seasoning, and the char that comes from the pan-frying process, a bold red worked best. I had a Malbec from my local winery, made with grapes from Oregon. Malbec has more fruit flavors than another bold red like a Cabernet, but with the same smoky, tannin taste that pairs well with steak and other grilled foods!